We have looked at the different ways in which frames in your beehive will be used for brood. There are some very specific patterns a healthy colony will show in the way in which the brood is laid out.
Here we look at some of the signs you will want to check at each inspection and when to be concerned about possible problems.
Let’s first recap the primary ways in which comb throughout the hive is used. For illustrative purposes, a Langstroth hive is assumed but the basic principles are similar for Warre and Top Bar hives.
How Space is Used
Brood
After her mating flights, the queen will start her long life of egg-laying in earnest. In a typical Langstroth hive, she will start in the lower box, which lays on top of the bottom board. Workers will have started constructing comb, either free-standing in foundationless frames or over artificial cells on regular frames.
Honey
The creation and storage of honey is an essential function of the colony. Beyond the obvious nutritional benefits, honey is the essential lifeline that allows the colony, via the winter cluster, to make it through the winter.
Pollen
Pollen is also essential to the colony, providing protein and fats. After collection, pollen is mixed with nectar and water, to form “bee bread”. This is then stored in comb within the hive. As well as the nutritional value, this also helps with the structural integrity of the comb.
Pollen is often placed immediately adjacent to the brood nest since it is used heavily as the source of protein.
A Few Words About Foundation and Your Inspection
Your choices for foundation are many, each with an impact on the ease with which you can inspect the brood pattern.
A key decision is whether you use foundation. There are advantages to letting your bees build their own foundation entirely, but be aware that the comb will initially be VERY fragile. There’s nothing quite so disheartening as a hard-earned comb coming crashing down as you lift a frame from the box.
If you choose to use foundation, which is a very popular approach for the new beekeeper, then you will have many choices about which foundation to use.
We recommend that, whatever your choice, make sure that the surface on which your bees overlay their own comb is beeswax. Many frames include a good combination of a rigid plastic foundation, for stability and strength, covered by a layer of beeswax. Some types of frames can be ordered with an extra thick layer of beeswax to increase the chance of bees feeling comfortable on this surface.
Consider, too, the color of the foundation you use, particularly in the brood box. As we will see, eggs can be difficult to see, even by those with good eyesight. They are somewhat easier to spot on a black foundation, as compared to a more natural or white foundation which is common in honey boxes.
See below for a suggestion for those with poor or limited eyesight.
The Progression of a Brood Cell
Let’s consider first a single cell. Let’s further imagine that this cell is in an area of the hive that the colony has decided will be for brood. We will start with the egg and consider the visual appearance of the cell.
Egg
The egg is laid by the queen at the bottom of the cell. For the sake of discussion, let’s assume she fertilized the egg, so this egg is likely destined to be a worker.
Eggs are pretty small! But they can generally be seen with a little squinting and the right light. For those who are a little challenged in this area, a lighted magnifying glass mounted on a headband can be helpful.
The eggs will turn to larvae in just three days or so.
Larva
Within three days, the egg has developed into a larva. Worker bees will feed the larva and, again, we will make an assumption here, namely that they stop feeding royal jelly after three days because our imaginary bee is going to be a worker. The larva is a striking “milky” white with the distinctive curled shape developing over time.
Capped Cell
Around the time the transformation from larva to pupa takes place – at about day nine – workers will cap the cell. The color of capped brood is darker and rougher than cells that contain honey. The cap is porous, which allows the larvae (and eventually pupae) to breathe.
Pupa
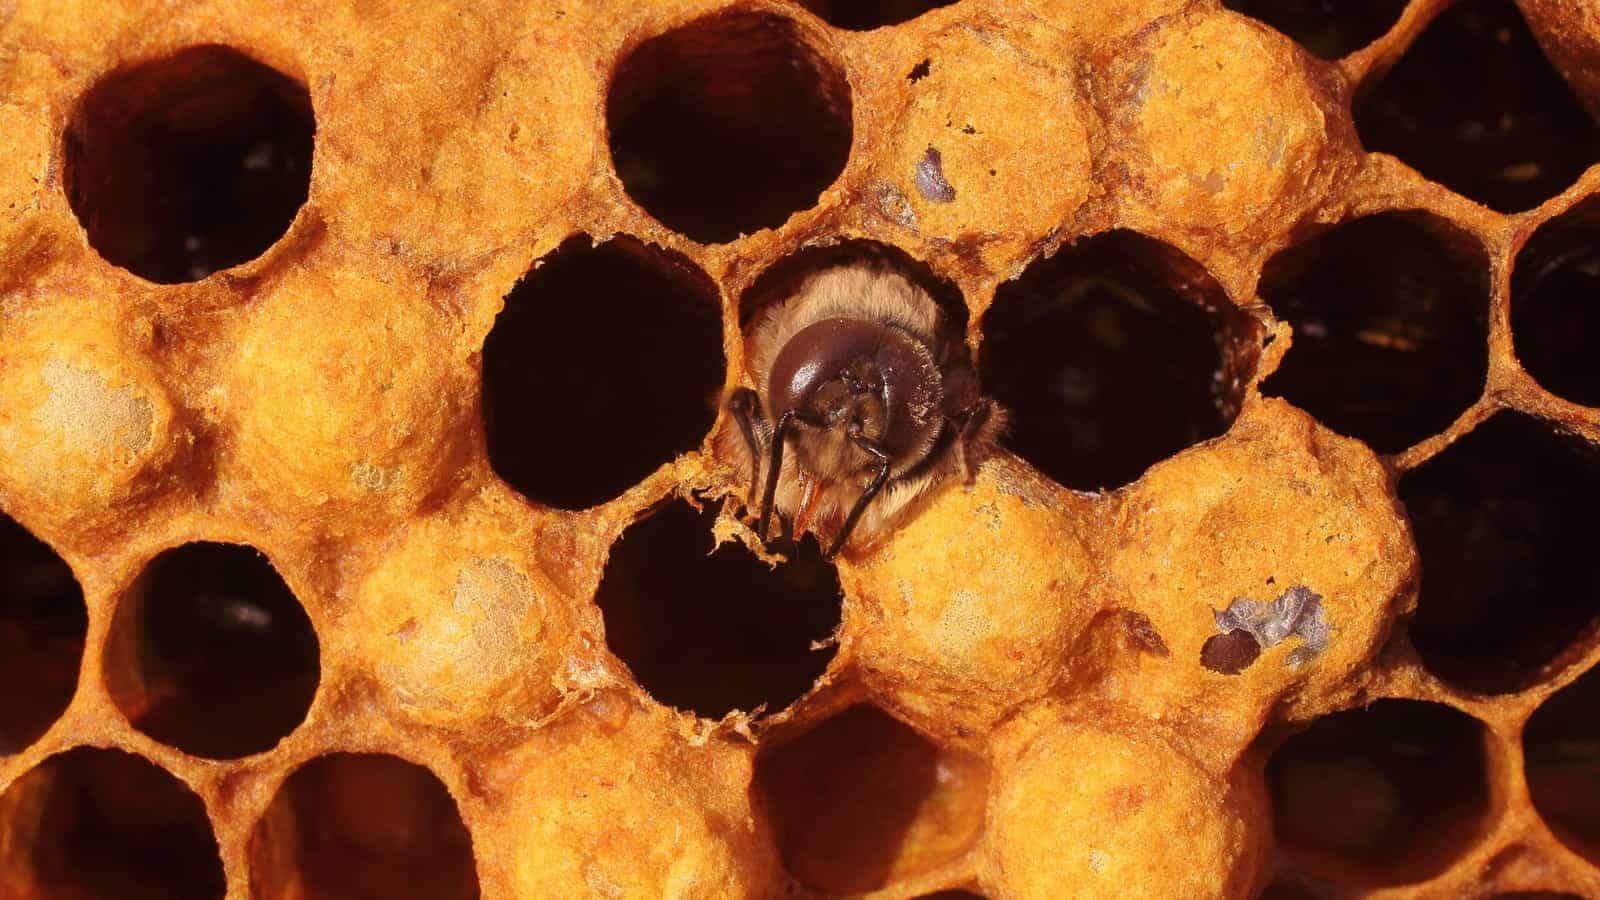
At this same time (for workers – the timetable is different for drones and queens) the larva will start to transform into a pupa. After a few more days, the pupa reaches the state from which the adult bee will emerge from the capped cell (note: the image below happens to be a drone, but the event is the same).
Use of Comb Real Estate for Brood
Frame Usage
The five states represented by these changes – egg, larva, capped brood, pupa, and empty cell – will each be evident in many cells in the brood nest. As the queen moves around the hive, each time she lays an egg she kicks off this timeline for one particular cell. Then she moves on to the next cell and does the same. And on and on. Over the course of a single day, she may lay around 2,000 eggs.
She will move around the hive in a somewhat predictable fashion. She will start in the middle of the foundation and then follow ever-increasing circles, as she builds out from the center.
As she does so and as time passes, the beekeeper will see specific sections emerge with each of the states. For example, an area of one frame you inspect might have a brood area filled with eggs. Her earlier path will be evident from the presence of larva and then some capped brood. The transitions from one state to another effectively describe the timeline of when the queen laid eggs.
3D Brood
Imagine the shape of a Langstroth box. In this space, we install frames. For our illustrative example, let’s assume we have a 10-frame box. We will metaphorically number these 1 to 10, from one end to the other. With us so far? OK, let’s discuss the brood nest.
Let’s assume that the colony is quite mature and the queen has been laying eggs for quite some time. What sort of patterns will we see throughout the 10 frames?
The 3D pattern of brood that will be laid by the queen is akin to a football being “embedded” within these 10 frames. If you take out a single frame from our well-developed box, you are effectively looking at a vertical slice of that football.
On each frame, there is an oval-shaped area used for brood. The middle frames – let’s say frames 4, 5, and 6 – have the largest area of comb assigned to brood. As you move out from the center, for example to frames 3, 2, and 1, the area of the oval is reduced, hence the football-like shape.
The queen will lay eggs on one side of a frame and then switch to the other side. One benefit of this is that there is a warming effect, between the two sides of the foundation, to help keep the brood warm.
Worker Cells
The majority of cells are destined to accept fertilized eggs, one for each cell. In most cases, the result will be a worker bee. These are by far the most numerous of the cells in the brood nest, reflecting the importance of a steady stream of new workers as the colony grows.
Drone Cells
A certain percentage of cells – perhaps up to 20% – will be dedicated to drones. These cells are larger in volume and have a darker, rougher cap which bulges out from the cell, somewhat resembling a bullet.
Drone larvae and pupae do better with slightly lower temperatures than workers. For this reason, drone cells are often placed at the lower edges of the frame, away from the heat formed by the cluster.
Queen Cells
Finally, the colony will occasionally create queen cells, often called queen cups. These are much larger cells and peanut-like in shape. There are a number of reasons why they might be created. A colony will often “build up and tear down” queen cups, with no particular intent to fully develop a new queen. The occasional queen cup created and torn down in this way is normal behavior. It is almost as if the bees are “practicing”.
Queen cups might be created for other reasons though.
If the queen cups are built along the sides of the frames then the colony may be thinking of supersedure i.e. replacing the current queen with a new one.
If the queen cups are along the bottom of the frames then this should be taken seriously as a sign that the colony is considering swarming.
What to Check
As you look at the brood pattern, seek “norms”. Look, for example, for a solid block of brood being formed in the central frames. You should see areas of eggs, larvae and capped brood. There may be the occasional empty cell but, for the most part, the brood area should be reasonably solid across the foundation. Spotty coverage could be a cause for concern, since many diseases show this as a calling card.
Pollen will often be above the brood area, with the lighter capped cells containing honey above that. The pattern of brood, pollen and honey is often described as a rainbow, such is the pattern it makes.
The cap on brood cells should be smooth and slightly convex (this is more pronounced with drone cells). If the caps are sunken, rather than raised, then this could indicate a disease.
Here is a reasonably detailed look at the inspection of a frame.

